|
本帖最后由 Traxxas 于 17-12-11 16:36 编辑 TRAXXAS技术视频第二十四期---Traxxas TRX-4 如何安装防水LED灯 视频原创发布者 BY TRAXXAS 翻译者 BY TRAXXAS中国总代理电波模型 因涉及到模型专业术语,如若翻译有误,欢迎指正! 
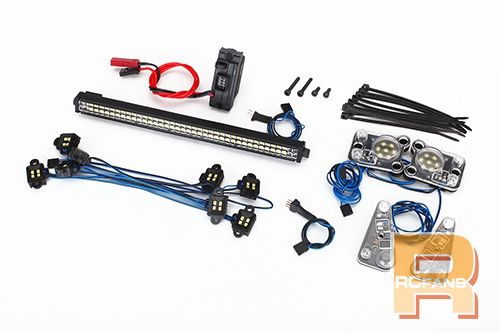
以英文原档为准,请参考: How to Install the LED Light Kit | Traxxas TRX-4 Today, we are going to show you how to install the optional TRX4 LED light kit. To start, you will need some basic tools, needles nose pliers, side cutters, an RC body reamer, and 1.5mm, 2mm, 2.5mm Hex tools. Visit Traxxas.com to see all available light kits. We will install the head lights and tail lights, rock lights, LED lighting module and the roof-mounted light bar. Start by removing the 1.5MM screws from the fender flare, repeat this step for each of the 4 fender flares, once the fender flares are removed, you can remove the inner fenders from the body. The rear inner fender required removal of 2 screws towards the rear of the body. Next step, remove the 3 screws from the rear of each head light assembly using your 1.5mm hex tool. Remove the screws holding the tail light assembly together and set them aside. Now we can install the headlights and taillights. Start by placing the headlights buckets in the cutouts on the body. Install the headlights individually to ensure proper fit, replace the 3 screws in the rear of each housing. The taillights require the same assembly process. Place the LED taillight buckets in the cutouts provided, replace the screws in the rear of the taillight assemblies. Now, we will install the rock lights. Be sure to orient the inner fenders with the body to ensure proper fit. Remove the screws from each inner fender, once the screws are removed, you can remove the rock light covers pre-installed on the inner fenders. Set these aside with the screws. Place the rock lights and the square cutout on the inner fenders. Once you are happy with the layout and the wire placement, take the 2mm driver and replace the screws you removed earlier. Continue this process for each individual rock light eight and total. Now you can reinstall the inner fenders on the body. Be sure to check the markers on the inner fenders to ensure proper orientation. Place the inner fenders on the body and make sure everything fits properly. With the inner fenders in place, you can reinstall the fender flairs. Be sure to line the screw holes up with the holes in the body before inserting the screws to ensure a clean install and no scratches on the body. Be careful not to over tighten the screws. With all four fender flares installed and the inner fenders back in place, you can now replace the two screws at the rear of the rear inner fenders. Now let’s tidy up the wiring. Wire ties are included to secure the wires to anchor points along the inside of the body. Take your time and ensure that the wire are neatly tucked away. Once the ties are in place, you could trim the excess with side cutters but make sure not to cut any of the wires. Now we will install the light bar on the roof of the body. A body reamer will ensure a clean hole to pass the wires through the body. Be careful with body reamer as they are very sharp. After you have reamed the wire routing hole in the roof, pass the rood light wires through the hole. With the light bar wires passed through, you can now install the light bar. Install the 2 screws to secure the light bar to the cage. Connect the plug for the dimmer switch on the light bar. When connected the switch on the light bar can brighten or dim the lights. We will install the LED lighting module to the chassis. Take the module and place it on the standoffs next to the ESC. Next you will take the black wire from the module and connect it to the ESC. For the next step, you are going to take the long red wire from the module and connect it to the receiver. For this step, you will need to remove the screws from the battery tray and the screws from the receiver box. Run the long red wire from the module under the battery tray. Carefully snip the original wire tie on the wiring and replace it with a new one to wrap around the new wire. Reinstall the hardware in the battery tray, making sure not to pinch any of the wiring. Remove the receiver box cover and wire clamp. Use the hex tools to gently push the red wire connector through the wire clamp and into the receiver portion of the receiver box. Pull most of the excess wire up into the receiver box but leave enough slack and the red wire to finish the installation with ease. Pull most of the excess wire up into the receiver box but leave enough slack and the red wire to finish the installation with ease. Replace the receiver housing ensure that the blue gasket stay in place. See the related video for more information on how to properly seal a receiver box. Connect to all wiring from the body to the 3 in 1 harness and connect this to the lighting module. Secure any excess wiring with wire ties. 请支持行货电子设备,电波模型总代理承担非人为损件保修一年,直接换新! 如果您想了解更多关于我们品牌的资讯, 请咨询电波模型淘宝店旺旺客服: http://rcmart.taobao.com/?spm=a1z10.1-c.0.0.U0xSpE 微信扫一扫,可得知最新资讯! 

或联系我们 QQ :2713236907/270570161 手机:13790546054 王小姐 |
广告投放|联系我们|手机|投稿|Archiver|About us|Advertise|遥控迷模型网|RCFans ( 粤ICP备10210518号-1 )
版权所有 RCFans.com © 2003-2016